How To Replace Headphone Pads
Few things are as annoying (and uncomfortable) as wearing headphones with cracked or completely worn out ear cushions! Chances are, you’re in a similar situation and want a few pointers before you start taking them apart.
Don’t let anyone tell you it’s a complicated process that requires hours and hours of research. In most cases, it’s really as simple as removing and replacing them with a brand new set of cushions. Keep reading to learn more about how to replace headphone pads!
How to Replace Most Headphone Pads
The entire process from start to finish is usually pretty painless (depending on the model and make of your ‘phones, of course). If you’ve ever replaced your earbud or earphone tips, you already have a good idea of what to expect. Before you do anything else, you’ll want to check if they’re easily removable, or glued in place.
The reality is, some headphones have easily removable ear pads and some don’t. It’s always a good idea to double-check the owners manual and/or original packaging to see what’s recommended by the manufacturer.
Beats, for example, require a slightly more rigorous removal process while many Monoprice or Sony cans do not. If yours are easily removable, you can follow along with the first section of our guide to get started!
Many of the best headphone brands today design models that can be customized in one way or another. Our step-by-step guide will walk you through the process for replacing both easily and not-so-easily removable cushions!
Here are the 4 main sections you can follow along with:
- Steps For Easily Removable Cushions
- Solutions For Non-Removable (Or Difficult) Cushions
- Changes In Sound Quality & Comfort
- Finding The Best Replacement Pair
If you’re ready to get started, take a look at the first step below!
1. Steps For Easily Removable Cushions
For easily removable cushions, use your thumb to lightly pull at a small piece around the outer edge.
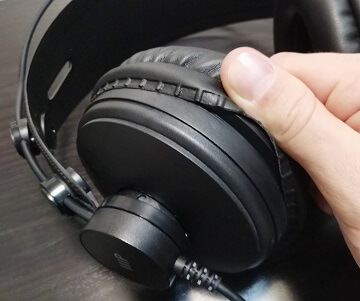
If you don’t feel, or see any glue or other adhesive holding them in place, you can continue to slowly peel them away from the ear cup. As you can see in the picture above, there isn’t any glue on this specific model (which is good news).
No Glue? Keep Going!
Once you’ve verified that yours don’t have glue either, keep working your way around using your thumb to lightly pull the entire pad away from the driver. Keep in mind, it should be pretty easy to gently remove each cushion. If you feel quite a bit of resistance, you might want to stop until you know for sure that they’re easily removable.
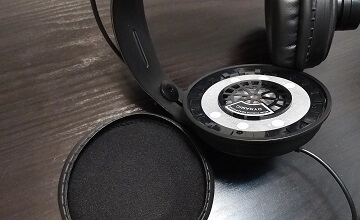
Once you’ve repeated the process for both sides, you’ll be able to see the headphone driver. (There’s no need to worry about damaging it during this process.)
Fitting The Replacement (Take Your Time)
Next, take your new cushions and start fitting a small piece of the lip around the ear cup. The Monoprice Modern Retro we used in the pictures have a ring all the way around where the padding sits.
Work your way around one small piece at a time, following the ring around the edge. There’s really no reason to rush through the process and you’ll find it much easier to go little by little.

As you can see, we started at the top and worked our way around. (It’s about halfway around the left ear cup in that picture.)
The Finished Product!
Once you’ve fitted the entire outer lip of the cushion around the ear cup, it should look something like this:
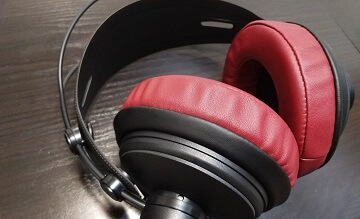
That wasn’t so bad, was it? Yours may look a little bit different if you’re using a different pair of headphones, but you’ll know you did it correctly when you can’t see any gaps between the pad and ear cup.
The last step is to try them on, plug them in, and see what you think! If your cans are a little bit more difficult, take a look at the next section for some easy solutions.
2. Solutions For Non-Removable (Or Difficult) Cushions
If you can see glue (or another adhesive) around the lining of either ear cup, you have a few different options. Removing pads that are glued on isn’t as easy as it might seem. You probably won’t be able to just use your thumb to peel them away.
Why not? Mainly because you might end up damaging the plastic on the outside if you’re not careful. As we mentioned above, Beats are one example of this scenario. The Beats Studio Wireless have what we would call ‘difficult’ cushions.
Beats Studio 2 & Studio 3 – Video Walk-through
If you have a pair of Beats Studio 2 or Studio 3, watch the video below to see the entire process from start to finish:
If you have a pair of Beats Solo 2 or Solo 3, follow the same exact steps from the video above. Beats ‘phones aren’t as easy to personalize since they’re only compatible with very specific pads.
Completely Non-Removable Cushions
Other headphones have completely non-removable cushions, in which case you may have to bite the bullet and buy a brand new pair. It’s pretty rare, but they do exist. Some people are willing to take the risk and attempt to remove then use their own glue to add a replacement, but we don’t recommend it.
After you’ve gone through the process and started listening to music, you might notice a few slight changes. Keep reading to learn more!
3. Changes In Sound Quality & Comfort
Changing ear cushions can (and usually does) have a noticeable effect on the way your ‘phones sound. For example, if their bass response is lacking before, it may increase or decrease depending on the size and material of the new cushions.
Why Does It Change The Sound?
Let’s say the stock pads are pretty thin. That means there’s less distance between your ears and the drivers (aka mini speakers). If you exchange them for thicker cushions, your ears will sit slightly farther away from the drivers.
Thicker and deeper cushions create more room for your ears to breathe. They can also cause an increase in bass. Thinner and shallower cushions usually have the opposite effect.
Detail Clarity & Soundstage
Things like detail clarity, volume, and sound profile can all be affected by the change. New cushions can add (or take away) warmth, increase (or decrease) bass reverberation, and even widen their soundstage.
Is there any way to tell how they’ll effect your ‘phones before you actually try it? Aside from reading reviews about specific replacement pads, the best test is to try it for yourself. (Not to mention if you grab a pair from Amazon and aren’t happy, you can always return them for a different pair.)
Most Common Changes To Expect (By Material)
Believe it or not, the material lining (and inside) the cushion can also change the way your music sounds. While that’s true, it does vary by brand and model. Aside from the changes in sound quality, keep in mind new cushions offer different levels of comfort, ventilation, and durability.
Here are a few general changes you might notice based on specific inner & outer materials:
- Memory Foam: wider soundstage + better comfort
- Velour: cleaner bass, comfortable + less ventilation
- Genuine Leather: adds bass, more durable/long-lasting + less ventilation
- Protein Leather: more bass, a great mix of comfort + durability
New cushions can affect not only sound and comfort but also noise isolation and even sound leakage. Some block more noise than they did before and others block less. Some keep sound in better than before and others tend to leak more sound.
Is The Difference Night & Day?
Either way, the change usually isn’t night and day to the point where they aren’t the same cans anymore. Remember, these are some general changes you might notice.
Some people don’t notice a huge difference in terms of sound quality and others notice it right away. Although you have your own reasons for exchanging cushions, many of us are chasing the most comfortable listening experience possible.
If comfort is your top priority and the sound slightly changes as a result, it’s definitely worth the trade off. If you’re already perfectly content with the way they sound and it’s altered in any way – you probably just need to try a different material.
Take a look at the section below for some tips on finding the best replacement pair!
4. Finding The Best Replacement Pair
This section is for you if you don’t already have some new cushions. At a certain point, it’s inevitable that you’ll either have to replace cushions, or buy an entirely brand new pair of headphones. The million-dollar question becomes, which one is less expensive? (Most replacements usually retail for around $20.)
Things To Consider Before You Choose
Before you buy a replacement pair, it’s important to choose the material based on your main priority. If you value comfort over everything else, you’ll probably want to try memory foam. If you want pads that are comfy and look good, you could try protein leather or velour.
Once you decide on a specific material, measure your current pads with a ruler or tape measure to make sure the new cushions will actually fit over both ear cups. (You can skip this step if your specific model is listed by the manufacturer.)
If you don’t already have a replacement set, here are a few recommendations! If you’re not sure whether your ‘phones are compatible, click the images to see full details for each pair.
Replacements For Medium-Sized Oval Headphones:
These two recommendations will work well for the Audio Technica ATH M50x, Shure SRH440, Sony MDR V6/7506, Sennheiser HD 280 Pro, and more.
Brainwavz Large memory foam over-ear (available in 8 different colors)
or

Oval-shaped Wicked Cushions (available in velour or protein leather memory foam)
Replacements For Beats Studio 2 + Studio 3:
These are model specific which means they’re only designed to be used with the Beats Studio 2 or Studio 3.
AGPTEK Titanium (available in 6 different colors)
Replacements For Beats Solo 2 + Solo3:
These are model specific which means they’re only designed to be used with the Beats Solo 2 or Solo 3.
Circular On-ear Wicked Cushions (available in 5 different colors)
Replacements For Extra Large Round Headphones:
The Brainwavz XL are a great fit for the Monoprice Modern Retro, Fostex T50RP MK3, AKG K240, HIFIMAN HE 400i and other extra large ‘phones. They are by far the most comfortable replacements we’ve ever personally used. Granted, they won’t work for every headphone, but they’re perfect for larger over-ear cans!

Brainwavz XL Circular memory foam (available in 4 different colors)
Keep in mind, aside from the Beats recommendations, some of our recommendations may work for your specific headphone (even if it’s not listed as being compatible). Your best bet is to click the image to double-check!
How Did We Do?
Now that you made it to the end, what do you think? Was our guide easy to follow along with? Hopefully, it helped make it a little bit easier to learn how to replace headphone pads! If you still have a few questions or want to leave your thoughts – feel free to leave a comment below.
We always do our best to respond (usually within 24 hours) and look forward to hearing from you! Thanks for dropping by and following along, we know you’ll enjoy listening with your new pads!
- Korg B2 vs Roland FP10 | Which One To Buy - May 13, 2021
- How Does Music Affect The Brain? – Let’s Find Out! - April 6, 2021
- Why Are My Headphones Crackling? – How To Fix It - April 3, 2021
