What Is A Headphone Clamp? – 3 Ways To Test It!
What is headphone clamp? How does it affect your listening experience? Are there any ways that you can test how much your cans have?
Before we get into the meat and potatoes of your question – yes, it does affect your listening experience (and in a pretty major way too). Throughout our brief guide, we’ll do our best to explain this commonly-used term in a way that’s simple and easy to understand!
We’ll also recommend 3 different testing methods that you can easily try for yourself at home! Are you ready to learn one of the most popular terms in the personal audio world? Let’s get started!
What Is A Headphone Clamp?

The Most Basic Definition In A Nutshell
Here’s the most basic definition for this term (and what it means at its core):
“The amount of pressure your cans apply to the area around (or on) your ears and to the top of your head.”
While this is the most basic definition – the amount of clamping pressure isn’t the only factor to consider. Also, keep in mind that this term only applies to circumaural (over-ear) and supra-aural (on-ear) cans. Read the section below to see how else it affects your listening experience!
How Does It Affect Your Listening Experience?
As you probably know, the pressure you feel when you’re wearing ‘phones will also have a major effect on other things like:
- freedom of movement
- long-lasting comfort
- detecting a high vs. low-quality build
Let’s take a closer look at each one below to see just how important each area really is!
Freedom of Movement
For example, if your cans sit very loosely on your head, you’ll have to worry about making sure you don’t bend down or turn your head too fast. Finding the right balance between too much and not enough pressure is usually the happy medium you want to look for.
This area is especially important if you plan on using your new cans for working out or running. The ability to have more freedom of movement is absolutely essential for active use.
Long-Lasting Comfort – Too Much vs. Not Enough Pressure
Listening to music using headphones can start to become a chore if your cans apply too much pressure (or not enough). In the worst cases, you can end up being more worried about constantly adjusting their fit, instead of just enjoying your favorite music.
Detecting a High vs. Low-Quality Build
Using some of the testing methods below can be used to help you determine how well-built your cans really are. In most cases, ear cups that loosely flop around or a headband that constantly slips without you adjusting it yourself can point towards a cheaper build.
How can you find the right balance if you don’t already own the pair you want to test?
What’s The First Testing Method?
One of the easiest testing methods is to wear your cans for at least one or two hours without taking any breaks. If you find yourself constantly reaching up to hold both ear cups and pull them away from your head, it’s usually not a good sign.
Are You Constantly Reaching Up To Make Adjustments?
It’s also usually not a great sign if you feel the need to reach up and remove one of the ear cups to give your ears some resting time. That being said, both examples do present a few exceptions. Excessive pressure isn’t always to blame for making readjustments.
If your earpads are made of genuine leather or another material that doesn’t provide the best ventilation, it would make perfect sense to let your ears breathe.
On the other hand, if you feel the need to pull both ear cups away from your ears because you feel them pressing down on your ear lobes too much – excessive clamp is usually to blame.
Ear Cups Rubbing Against Your Ears
If the ear cups start to rub against your ears it’s usually caused by one of two things.
- Ear cup padding is too thin
- Too much clamping pressure
In the first example, it’s usually pretty easy to simply replace both ear pads to add more cushion. (Easy, that is, unless your cans don’t have replaceable ear pads.)
If you feel that the pads provide adequate cushion and room inside for your specific ear size/shape – it may be caused by the pressure. Depending on which pair of cans you’re using – some will allow you to hold both ear cups and bend them outwards (without causing any cracking or terrible creaking sounds).
You could look at it like the breaking in the bill of a baseball hat. Most hats come with a completely flat bill by default and require you to curve it yourself – (unless you prefer to keep it flat, of course).
In most cases, performing a similar action with a well-built pair of cans will instantly help alleviate some of the discomfort. The reason that it works pretty well, in many cases, is because you are essentially stretching out the headband material like you would a sore muscle.
Possible Causes For Excessive Headband Discomfort
This brings us to the headband itself. Although headband designs are constantly improving to fit (and look) better – there will almost always be minor issues to address. One of the most common issues most people have in this area deals with even weight distribution.
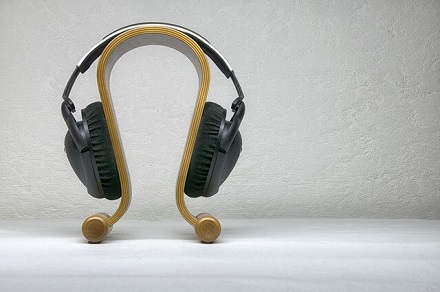
Some ‘phones have a headband that’s shaped like a canoe. Others have the more standard singular strip with padding underneath. Some cans don’t even have the traditional headband and instead utilize a hybrid design (similar to the image below). How does the actual shape of the headband affect clamping pressure?

Well, if your headband has the standard singular strip with padding design – that means that the entire weight of your cans will be resting on a single spot at the top of your head. If they also have excessive clamping pressure, you will usually notice 3 points of discomfort.
- left ear (lobe or outer area)
- right ear (lobe or outer area)
- top of your head (where the headband rests)
This is one of the main reasons why some headphones cost more than you might think they should. The extra attention to detail and choice of build materials both play a major role when it comes to creating a long-lasting, comfortable pair of cans.
Cans like the Philips Fidelio X2 use one of those hybrid designs we briefly mentioned above. They have what’s called a 3D mesh hammock that sits slightly suspended underneath a single standard headband. This creates a super comfy and evenly-distributed wearing experience. (They also happen to feature a great balance of just the right amount of clamping pressure.)
After you’ve tried wearing your cans for an hour or longer to see if you notice any of the 3 points of discomfort mentioned above, here’s another great method that takes less time!
What’s The Second Testing Method?
The only thing the second testing method requires is you and your cans. You can try it with both new and old ‘phones that you may have had for a while. Are you ready? Hold one ear cup in your hand and let the opposite earcup dangle in the air.
Now, lift your hand (holding the ear cup) up and down ever so gently. As you watch the dangling ear cup bobbing up and down – pay attention to how much ‘give’ they have. If you notice that they have more ‘give’ and flop around more than you thought they would – this is usually a sign of cans with less clamping pressure.
Excessive Movement & Creaking Sounds
If the dangling ear cup barely moves – that usually means they will apply more pressure around/on your ears and head when you’re actually wearing them.
You’ll also want to listen for any major creaking sounds. If your cans start to squeak like mice when you’re using this method – that’s usually another sign that your cans have less clamp. It’s also one of the most popular and time-tested methods for determining how well-built they are.
Although there are some higher-end headphones (like the Monoprice Monolith M1060) that have more ‘give’ or make minor creaking sounds when you put them through a test like this – most of the time, it’s the sign of a cheaper build.
Now that you’ve learned two of the main testing methods, take a look at the final method for one last quick test!
What’s The Third Testing Method?
The third method is the most basic and straightforward test. While the third and final method doesn’t necessarily test clamping pressure – it’s an easy way to see how well your cans hold their shape.
To test this aspect of their build design, all you have to do is take your ‘phones off and place them on your table or desk. Leave them resting on the desk then go do something else for a while (30 minutes or so is usually enough time). When you come back, check to see if they’re still in the same position you left them in.
If the headband is at a lower adjustment, or the ‘phones themselves are a slightly contorted – this could mean a few different things:
- Their build materials aren’t very sturdy
- There is a good chance that they’ll apply less pressure around your ears
- You might want to consider storing them on a quality headphone stand

Although most cans hold their shape fairly well while resting, there’s always an exception. Regardless of how well your cans hold their shape, it’s usually recommended that you store them in their carrying case or on a solid stand. Both storage methods go a long way towards preserving their quality (especially right out of the box).
Once again, this method is an easy way to test things like durability which may also point towards gauging how much clamping pressure your cans might have. Now that you’ve learned 3 easy methods for testing your cans’ wearing pressure, you might want to know which method will give you the best results!
Which Test Will Give You The Best Results?
Since there isn’t any scientific calculation (at least, not to our knowledge) for gauging wearing pressure – ultimately, how they feel when you’re wearing them is what matters the most.
Since these testing methods aren’t exactly a perfect science, it’s hard to say which method will give you the best results. In most cases, however, the first two methods are usually the best at producing the most accurate results.
Either way, without a doubt, after you’ve tried all 3, you’ll have a much better idea about what’s causing any major discomfort you might be experiencing! We all enjoy having a comfortable listening experience, but we don’t always exactly agree on how to achieve that.
This is where your personal wearing preference also plays a major role. If you’re someone who prefers a more secure and stable fit – you’ll probably enjoy cans with a stronger clamp. If you’re the opposite and would rather have more ‘give’ to your cans – wearing ‘phones with lighter clamping pressure would be more ideal.
What Do You Think? – How Did We Do?
Now that you’ve reached the end of our brief guide, what do you think? Did we do a good job or do you still have a few questions that you need to be answered? If anything we covered here was unclear or hard to understand, let us know by asking a question below!
If you think we did a great job explaining this term, hopefully, the next time someone asks “What is headphone clamp?” – you have the answer! Understanding simple terms like this will not only expand the library of terms you have stored away – but will also help you in the future when you’re looking for a new pair of cans!
The next time you read a review or watch an unboxing, you’ll know exactly what they’re talking about! We hope you enjoyed reading through our short guide! If you did, feel free to share it with your followers on your favorite social media platform! Thanks again for stopping by to learn, we hope to see you here again!
Sonic Elevation: Ride The Waves.
- Korg B2 vs Roland FP10 | Which One To Buy - May 13, 2021
- How Does Music Affect The Brain? – Let’s Find Out! - April 6, 2021
- Why Are My Headphones Crackling? – How To Fix It - April 3, 2021